

Planning My Room: 5 Essential Steps for Comfort, Style, and Success!
Ever felt overwhelmed at the thought of starting your home design project? You’re staring at these rooms, each bubbling with potential, yet the idea of transforming them into spaces that reflect your style and cater to your family’s needs seems daunting.
Your Pinterest and Instagram get a hammering and you’re more confused than when you began. You’re standing at the foot of a mountain, wondering how you’ll ever make it to the top.
But, here’s the thing – you’re not alone. Many Most start this journey feeling just as daunted.
Let me tell you about Emily. Emily is a busy mama with a deep love for her home. She dreams of turning each room into a reflection of her family’s personality and needs.
Her Pinterest board is overflowing with ideas – from cosy reading nooks to vibrant play areas for her kids. Yet, every time she decides to start, up rolls the indecision express….
Where to begin planning my room? Which style to choose? How to make sure it’s not just beautiful, but functional too?
This emotional tug-of-war is at the heart of interior design. It’s about balancing dreams with reality, ambition with practicality, Chateau taste with eBay budget…
Emily, like so many others, wants to ensure that her personal style shines through without compromising on the functionality that her family needs. This journey, although stressful at times, is also an opportunity for self-discovery and creativity.
The good news? The path to a beautiful, practical, cohesive home, one that resonates with your unique taste and lifestyle, is much easier to achieve than you might think.


With the right guidance, tools, and a sprinkle of creativity, what seems like an uphill task can turn into a beautiful adventure, leading to spaces you’ll love and cherish.
In this blog, I’ll walk through the initial, essential steps of your interior design project.
From understanding your space to setting achievable goals, finding your style and to budgeting wisely, I’m here to help you navigate this journey.
With over thirteen years in the industry, my journey has been all about breaking the mould of the ‘snooty’ designer stereotype.
I believe in an approachable, down-to-earth style of design that’s free from judgement and pretence.
My philosophy? It’s simple: interior design should reflect your personality, not a rigid set of ‘high-end’ rules created by a select few who dictate what beauty should mean to you.
I understand that creating a home is a deeply personal journey, and I’m here to guide you through it with practical advice and a listening ear. So, forget any fears of being judged or pressured into trends that don’t feel right.
In this blog, I’ll share insights to help you craft a space that’s authentic to you – a home where your story is the star.
So, let’s take that first step together and turn your design aspirations into reality.


What is the first thing to do when starting an interior design project? Get a room design tool like this!
Grab this guide of course, your very own room design tool, here are your first steps. What we’ll cover…
Step 1 // Understanding Your Space And Needs
Step 2 // Setting Clear Goals
Step 3 // Finding Your Style
Step 4 // Budgeting Wisely
Step 5 // Planning Your Project Timeline
Step 6 // Seeking Support and Advice
Step 7 // Embracing the Journey
How Do I Plan My Room Layout? // Where to Begin?
Step 1 // Understanding Your Space And Needs
Before diving into creating a floor plan, colours, fabrics, or themes, the first step in any successful interior design project is to understand your space and its needs. It’s about taking a step back and looking at your home not just as a structure, but as a living part of your daily life.
Assessing the Current State of Your Space
- Start by walking through each room and taking note of its current state. Ask yourself: What works in this space? What doesn’t?
- Consider the natural flow of the house. How do you move from one room to another? Are there areas that feel cramped or unnecessarily vast?
- Look at the natural light sources. How does light travel through the room throughout the day? This can significantly influence your design choices.
Evaluating Each Room’s Functionality and Potential
- Functionality is key. Think about how each room is used. A living room might not just be for sitting; it might be a play area, a study spot, or an entertainment zone.
- Don’t overlook underutilised spaces. That neglected corner could become your favourite reading nook or a small home office.
- Consider flexibility in spaces. As your family grows and changes, so will your space needs. Rooms should be able to evolve over time.
- Considering Family Usage. Reflect on how your family uses each space. A child’s play area might need more open space and durable surfaces, while a dining room might require more formal or intimate settings.
Ensuring safety and comfort in your home, especially in areas where the whole family gathers, is absolutely key. It’s a good idea to weave in design elements that not only look great but also make day-to-day life safer and more convenient. Think about using soft-edged furniture, non-slip rugs, and surfaces that are a breeze to clean – these small touches can make a world of difference.
Your home is a special place that tells the story of everyone who lives there. It’s lovely to get the whole gang involved in the design process, giving everyone a chance to chip in with their own ideas and preferences. After all, creating a space where each person feels truly at home is what makes your house so wonderfully welcoming and inclusive.
Getting to grips with how you use your space is the first step towards creating a home that’s not only easy on the eyes but practical and in tune with how you and your family live. A bit of smart planning goes a long way in crafting a living space that’s both stunning and superbly suited to your needs. To help you along, here are some handy checklists for things to think about as you walk around your rooms:
Room Design Planner // Essential Checklists for Every Room in Your Home
Here are some questions to think about for each space in your home. Each checklist is tailored to the specific needs and functions of the room, ensuring a well-rounded approach to your design project.


Planning My Room // Living Room
- Functionality: Determine the primary use – relaxation, entertaining, family time.
- Seating: Plan adequate and comfortable seating based on the room’s size and your family’s needs.
- Lighting: Consider layers of lighting – ambient, task, and accent.
- Storage: Plan for storage solutions like shelves or cabinets to minimise clutter.
- Colour Scheme: Choose a colour palette that reflects the desired mood and complements the rest of your home.
- Focal Point: Identify or create a focal point, like a fireplace, artwork, or a feature wall.
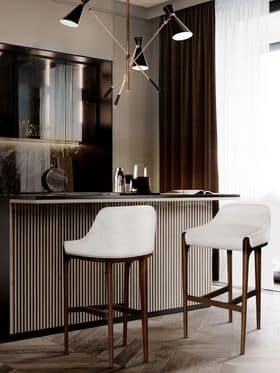

Planning My Room // Kitchen
- Layout: Focus on a functional layout with the work triangle (stove, sink, refrigerator) in mind.
- Storage: Maximise storage with smart cabinet solutions.
- Appliances: Choose appliances that suit your cooking needs and lifestyle.
- Countertops: Select durable and easy-to-clean materials.
- Lighting: Incorporate both task lighting and ambient lighting.


Planning My Room // Bedroom
- Comfort: Prioritise a high-quality mattress and bedding for maximum comfort.
- Lighting: Include soft, relaxing lighting and options for reading.
- Storage: Plan for adequate wardrobe and closet space.
- Personal Style: Incorporate personal touches through artwork, photos, or decor.
- Colour Scheme: Opt for calming colours that promote relaxation.
- Sleep: How well do you sleep? If the answer is not very then look at ways to minimise light ingress and select a restful colour palette that promotes serenity and relaxation.

Planning My Room // Child’s Bedroom
- Safety: Ensure all furniture and fittings are child-safe.
- Flexibility: Choose furniture that can grow with your child.
- Storage: Include plenty of storage for toys, books, and clothes.
- Play Area: Allocate a space for play.
- Educational Elements: Consider areas for study or creative activities.


Planning My Room // Home Office
- Desk Placement: Position the desk in a well-lit area, preferably near natural light.
- Ergonomics: Invest in a comfortable, ergonomic chair and desk.
- Storage: Include shelving or cabinets for office supplies and documents.
- Technology Needs: Plan for adequate sockets and internet connectivity.
- Distraction-Free Zone: Ensure the space is separated from household distractions.


Planning My Room // Bathroom
- Layout: Prioritise a practical layout, considering plumbing and space.
- Storage: If possible, include storage for toiletries and linens.
- Ventilation: Ensure good ventilation to prevent mould and dampness.
- Lighting: Include bright, functional lighting.
- Durable Materials: Use water-resistant and easy-to-clean materials for surfaces.
- Take a look at this post for the ultimate guide for how to design a bathroom
Step 2 // Setting Clear Goals
Once you’ve got a good grasp of your space and needs, the next critical step is setting clear, attainable goals for your project. It’s like plotting points on a map before a journey – knowing your destination makes the path clearer and the journey more enjoyable.
The Importance of Clear Objectives
Begin by asking yourself: What do I want to achieve with this project? Is it purely aesthetic, or are there functional improvements needed?
Be specific about what you want to change. Instead of a vague ‘makeover’, think in terms of ‘creating more storage’ or ‘brightening up the living area’. Get super clear on what problems you would like to solve, how you can make your room better.
Remember, well-defined goals are the blueprint for a successful design project. They guide your decisions and help keep the project on track.
Setting Realistic and Achievable Goals
Be realistic with your goals considering your budget, timeline, and resources. It’s about striking a balance between your dream design and what’s practical.
Consider the long-term implications of your design choices. Aim for a timeless appeal that you’ll love for years, rather than just following the latest trend.
A Simple Goal-Setting Exercise
To help you articulate your goals, here’s a simple exercise: Create a ‘Goal Chart’ with three columns – ‘Must Have’, ‘Nice to Have’, and ‘Dream Features’.
In ‘Must Have’, list elements essential to your lifestyle or the functionality of your space. For example, more kitchen storage or a child-friendly living room.
‘Nice to Have’ could include aesthetic desires like a specific style of curtains or a particular colour scheme.
‘Dream Features’ are those aspirational elements you’d love but can live without – like high-end appliances or luxury finishes.
This chart will not only clarify your goals but also help you prioritise them during the design process.
By setting clear and realistic goals, you’re laying a solid foundation for your interior design project. This clarity not only makes decision-making easier but also ensures that the end result is a space that truly meets your needs and reflects your personal style.
Inside the free How To Design A Room HomeEnvy Blueprint, you’ll find a workbook and fillable PDF for creating your wish lists for your home design project, click here to grab it.


Step 3 // Finding Your Style
Identifying your personal style is one of the most exciting parts of the interior design process. It’s about expressing who you are through your living space. But how do you pinpoint a style that feels authentically ‘you’?
Let’s take a mooch…And if you’d like a deeper dive take a look at my curated collection of styles over on Pinterest, almost 2000 images that should get the creativity flowing.
Discovering Personal Style Preferences
- Start by observing your current environment and belongings. What items do you love and why? This can reveal a lot about your style preferences.
- Think about your lifestyle and daily routines. Your home should not only look good but also suit your way of living.
- Don’t forget to consider architectural elements of your home. Your style should complement, not clash with, these features
- And let’s not forget about colours here, there is a good chance you’re constantly surrounded by the colours you’re drawn to, just take a look at your clothes. Unless it’s black, might be a little heavy on your senses.
Creating a Mood Board for Inspiration
- A mood board is an excellent tool for visualising your style. Gather images, fabric swatches, colour samples, and anything else that inspires you.
- Apps like Pinterest are perfect for creating digital mood boards. They allow you to collect and organise images from various sources in one place.
- Your mood board should evolve as you refine your style. It’s not set in stone, so feel free to adjust it as your project progresses.
- If you’d like a simple tutorial for how to create a mood board to keep handy on your phone, click this link
Blending Different Styles for Cohesion
- It’s common to be drawn to more than one style. The key to blending styles is finding a common thread – be it colour, pattern, or material. Check out this post for 8 ways to mix decor styles.
- Balance is crucial. If you mix a modern and rustic style, for instance, ensure one doesn’t overpower the other.
- Cohesion can also be achieved through repetition. Repeating elements like wood finishes or metal accents throughout your space can tie different styles together seamlessly.
If you need help creating your mood boards then grab the Ultimate Home Design Toolkit where I show you exactly how to do it for all ability and skill levels.


Step 4 // Budgeting Wisely
Ah the elephant in the room, budgeting. After years of client meetings and budget discussions, let me tell you, no one likes talking about the big bad B word! Budgeting might not be the most glamorous part of interior design, but it’s undoubtedly one of the most critical.
A well-planned budget ensures your project runs smoothly without any stressful financial surprises.
Setting a Realistic Budget
- Start by determining the total amount you’re comfortable spending. Be honest and realistic about what you can afford.
- Break down your budget by room or by project phase. This will give you a clearer understanding of where your money is going.
- Remember to include a contingency fund. Unexpected costs are a common part of home improvement projects.
Allocating Funds Across the Project
This is where your goal chart will come in handy. Prioritise spending on key pieces or areas that will have the most significant impact. For example, a quality sofa for your living room might be a better investment than high-end dining chairs.
Consider the long-term value of your purchases. It’s often worth investing more in high-use areas or items that will last longer.
Cost-Saving Strategies and Smart Investments
- Don’t shy away from comparing prices, looking for sales, or considering second-hand items. These can lead to significant savings.
- Invest in areas that will add value to your home, like kitchen improvements or energy-efficient upgrades
- DIY where you can. Simple tasks like painting or minor installations can save you money if you’re comfortable and capable of doing them.
- And if you’d like to get huge discounts and shop like a professional, take advantage of the trade partnerships we have inside The Home Design Vault for huge savings at sought after brands and retailers. Farrow & Ball, Mandarin Stone, Pooky Lighting, Loaf.com and hundreds more.
In essence, wise budgeting and savvy shopping is about making informed decisions that balance cost with value, ensuring your project aligns with both your financial limits, your design dreams and helps you get the biggest ROI.

Step 5 // Plan Your Room Design
Creating a realistic and manageable timeline is essential for a smooth and stress-free interior design project. It’s not just about setting deadlines; it’s about pacing your project in a way that suits your life and minimises disruption.
Creating a Manageable Timeline
- Begin by listing all the tasks that need to be done, from the initial planning stages to the final touches.
- Assign a realistic duration to each task. Research typical timescales for tasks like painting, ordering furniture, or getting custom pieces made.
- Use a calendar or planning tool to map out these tasks. This visual representation helps you see how the project will progress over time.
Pacing the Project
- Consider your personal and family schedule. Avoid planning major work during busy or stressful periods.
- If you’re doing the project in stages, prioritise rooms based on your family’s needs. For example, you might start with the living room if it’s a central part of your home.
- Remember, it’s okay to take breaks between stages. This can help manage both your budget and stress levels.
Avoiding Common Pitfalls
- One of the most common pitfalls is underestimating the time required for each task. Always add a buffer to your estimates to account for unexpected delays.
- Avoid changing plans mid-way. While some flexibility is necessary, frequent changes can lead to delays and cost blowouts. The more you change the more work your trades have to do and this can be a nightmare for your finances, labour costs can be a project killer.
- Stay in regular communication with any trades and professionals involved in your project. Miscommunication can lead to mistakes and delays.
By planning your project timeline carefully, you can ensure that the redesign is an enjoyable process rather than a source of stress. A well-planned timeline not only keeps your project on track but also allows you to enjoy the transformation of your space at a comfortable pace.

Step 6: Seeking Support and Advice // For Your Frequently Asked Questions
In the journey of designing beautiful, swoonworthy spaces, seeking inspiration and advice is like gathering the right tools before you start building. It’s about opening your mind to new ideas, learning from the expertise of others, and embracing a community that shares your passion.
Embarking on an interior design project can be a thrilling adventure, but it also comes with its complexities. Seeking expert advice and support is crucial in navigating these waters smoothly. It’s about tapping into the wealth of knowledge and experience that professionals and communities offer, ensuring your project not only meets but exceeds your expectations.
Leveraging Professional Expertise
- Schedule consultations with interior design professionals. Even brief meetings can offer invaluable insights and steer your project in the right direction.
- Attend home design shows and workshops. These events are goldmines for practical advice and up-to-date industry knowledge.
Utilising Online Communities and Forums
- Participate in online interior design forums and social media groups. These communities are fantastic for sharing ideas, getting feedback, and learning from others’ experiences.
- Engage actively in discussions, ask questions, and share your project’s progress. If you’re in a facebook group then search for answers to your questions, this will help you see how others have navigated similar scenarios or concerns. The collective wisdom of a community can be incredibly enriching.
Seeking Advice from Local Design Centers and Showrooms
- Visit local design centres and showrooms. The staff here usually have extensive product knowledge and can offer personalised advice based on your specific needs and preferences.
- These visits can also provide hands-on experience with different materials, finishes, and design elements, helping you make more informed choices.
Collaborating with Industry Experts
- Reach out to architects, interior designers, or decorators for in-depth guidance. Their expertise can transform your vision into a tangible and functional design.
- Collaboration can bring a new perspective to your project, introducing innovative ideas and solutions you might not have considered.
Join the Home Design Vault Membership
- Consider joining the Home Design Vault membership. This platform provides exclusive access to expert advice, tailored resources, and a supportive community of fellow homeowners all walking your path.
- Benefit from curated content and tutorials that cater specifically to home design and décor. It’s like Netflix for home design.
In seeking advice and support, you’re not just gathering information; you’re building a network of resources and relationships that will enrich your home design journey. With the right guidance, your project will not only reflect your personal style but also embody professional finesse and functionality.
Step 7 // Embracing the Journey
Embarking on a home design project is not just about the destination; it’s about embracing the journey itself. If you follow this 7 step process you will actually enjoy the journey, there will be less bumps in the road and your final destination will be swoon-worthy spaces.
This process is a creative exploration, one that should be filled with enjoyment and personal growth. Remember, your home is an evolving canvas, not a race to the finish line.
Understanding Interior Design as a Process
- Recognise that good design takes time. It’s a gradual process of layering and refinement, not an instant transformation.
- Enjoy each phase, from the initial brainstorming to the final styling. Each step is an integral part of creating a space that truly feels like home.
The Importance of Patience and Flexibility
- Be patient with yourself and the process. Unexpected challenges may arise, but they often lead to new insights and better outcomes.
- Stay flexible and open to changes. Sometimes the best ideas emerge from the need to adapt or rethink a part of your plan.
Building Confidence in Your Personal Choices
- Trust in your choices and your vision for your space. Your home should reflect your personality, lifestyle, and the stories you want to tell.
- Don’t be swayed by fleeting trends or the opinions of others. Confidence in your design choices makes your home uniquely yours.
Embracing the Ongoing Nature of Design
- Your home can continue to evolve over time. It’s perfectly okay to update, change, or add new elements as your life and tastes change. Since 2006 I’ve gone from shabby chic to modern transitional today with a few iterations in between, everyone’s style evolves.
- View your home design project as a journey of creativity and expression. It’s a wonderful opportunity to experiment, learn, and grow in your understanding of design.

In embracing this journey, you’re not just creating a space; you’re crafting an environment that resonates with your essence. It’s about taking pride and joy in the process of making your house a true reflection of you.
So, step forward with excitement and confidence, and let your interior design journey be a fulfilling adventure.
As we come to the end of our where to begin guide, let’s briefly recap the key steps to embarking on your home design journey.
From understanding your space and setting clear goals, to finding your unique style, budgeting wisely, planning your timeline, seeking expert advice, and finally, embracing the entire journey – each step is a building block towards creating a space that not only looks beautiful but feels like a true extension of you. Take your time, it’s where the magic happens!
I’d love to hear about your first steps on your design journey. Share your experiences, plans, or the inspirations you’ve gathered. If you have any questions or need further guidance, don’t hesitate to let me know, I’m over on instagram all the time and share fun (and informative) posts to help you create a stunning home.
This is not just a solo journey; it’s a shared adventure involving many people in the world of design. Don’t design alone!
Don’t forget to grab your How To Design A Room // HomeEnvy Blueprint to get your project started and planned to perfection..
Your home is a reflection of your journey – unique, evolving, and full of stories. Embrace each moment of this creative process, and let your home be a testament to your personal style and journey.
Save For Later? Pin Now!


